

Scrap.Abode (warehouse) OPEN DAYs

The Scrap.Abode is only OPEN every Wednesday (10:00am to 1:00pm) every month for walk-ins.

Please follow our Instagram and Facebook account and subscribe to our Newsletters for the latest news, flash sales and more.

Enjoy 50% off selected items from Scrap-n-Crop.com RED DOT SALE when you visit us on our Open Days | please email us 24 hours prior to the Open Day if you'd like to self collect your online orders at the Scrap.Abode

Showing posts with label tag. Show all posts

Thursday, December 17, 2015

TIPS & TECHNIQUES: Tim Holtz 12 Days of Christmas Tags

Year in, year out, we've been inspired by Tim Holtz 12 Days of Christmas Tags … so here we are reblogging it for you!

Note that Scrap-n-Crop.com carries a large range of Tim Holtz Ideology products and other collaborations with top scrapbooking brands such as Sizzix and Ranger Ink.

12 tags of 2015 - December | www.timholtz.com

the holidays are in full swing and the studio is buzzing with festive creativity.  i hope the final tag of the year will inspire you to take time during this busy holiday season to give these ideas a try.  we start by transforming plain burlap into a colorful patterned masterpiece, then layer punched paper shapes into yuletide evergreen, and finish everything off with a few findings and a splattering of distress to create a winter wonderland.  here’s wishing you all a creative and magical christmastime…t!m

supplies:


surfaces: textured surfaces/ burlap, #8 manila tag, kraft core
embellishments: jingle brads, chitchat stickers/occasions, crinkle ribbon, mirrored starsdistress ink: ground espresso, walnut stain
distress spray stain: fired brick
distress paint: picket fence
alcohol ink: mushroom
punches: pine, juniper, laurel
die: decorative strip bow tied
tools: layering stencil/THS032, distress splatter brush, sanding grip, ink blending tool, craft sheet, tiny attacher, scissors, vagabond
adhesives: hot glue, glossy accents
misc: pencil, sewing machine, power punch, paper towels

12 tags of 2015 - December | www.timholtz.com
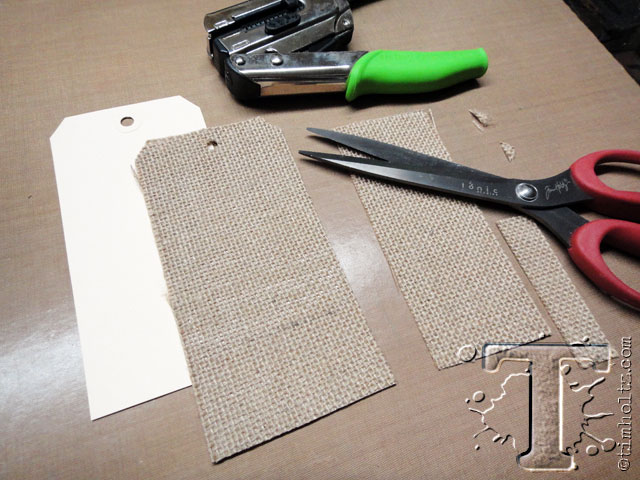
step 1: start by cutting a tag shape from a sheet of textured surfaces burlap and punch a hole through the top using a power punch (or crop a dile).
12 tags of 2015 - December | www.timholtz.com
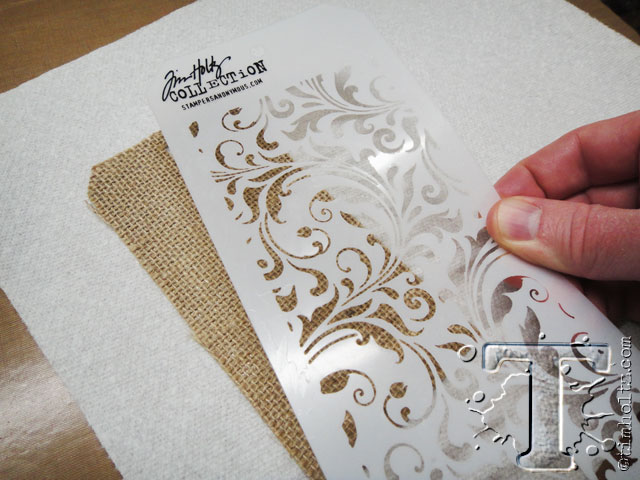
step 2: place just the burlap tag shape on a paper towel and position layering stencil over the top.
12 tags of 2015 - December | www.timholtz.com
step 3: ink over the stencil using distress spray stain – do not use too much stain or it will seep through the stencil.
12 tags of 2015 - December | www.timholtz.com
step 4: place a dry paper towel over the stencil to blot off the excess stain before removing the stencil.
12 tags of 2015 - December | www.timholtz.com
step 5: lift the stencil off of the background to reveal your patterned burlap and let inks dry or dry with a heat tool.
12 tags of 2015 - December | www.timholtz.com
step 6: remove the adhesive backing from the burlap (my favorite thing about textured surfaces is that they are all adhesive backed).
12 tags of 2015 - December | www.timholtz.com
step 7: adhere the “printed” burlap to the manila tag.
12 tags of 2015 - December | www.timholtz.com
step 8: ink the edges of the tag with distress ink using an ink blending tool.
12 tags of 2015 - December | www.timholtz.com
step 9: select several colors of kraft core cardstock for the greenery and bow.
12 tags of 2015 - December | www.timholtz.com
step 10: sand the kraft core (on a surface other than your craft sheet) using a sanding grip.
12 tags of 2015 - December | www.timholtz.com
step 11: punch one design per color of cardstock. note: if you alternate the punch you can get more punched from a strip.
12 tags of 2015 - December | www.timholtz.com
step 12: lightly ink the edges of all punched shapes with distress ink using an ink blending tool.
12 tags of 2015 - December | www.timholtz.com
step 13: trace a circular shape on the burlap with a pencil.
12 tags of 2015 - December | www.timholtz.com
step 14: gently scrunch and crumple the punched shapes to give them dimension.
12 tags of 2015 - December | www.timholtz.com
step 15: start at the bottom center of the circle and adhere your pieces with hot glue.
12 tags of 2015 - December | www.timholtz.com
step 16: layer each piece by slightly stacking it over the previous one working your way around the circle.
12 tags of 2015 - December | www.timholtz.com
step 17: repeat the same process for the other half of the circle changing direction of the shapes.
12 tags of 2015 - December | www.timholtz.com
step 18: once you've made it to the top of the wreath, leave a gap for the bow.

12 tags of 2015 - December | www.timholtz.com
step 19: die cut the smallest bow and center strip from the bow tied die.
12 tags of 2015 - December | www.timholtz.com
step 20: ink the edges of cut pieces with distress ink using an ink blending tool.
12 tags of 2015 - December | www.timholtz.com
step 21: accordion fold the bow on the small areas using your fingers and hold in the center as shown.
12 tags of 2015 - December | www.timholtz.com
step 22: secure the center with a single tiny attacher
12 tags of 2015 - December | www.timholtz.com
step 23: once the bow is secure, gently pull the ends of the bow down.
12 tags of 2015 - December | www.timholtz.com
step 24: wrap the center strip around the middle of the bow to cover the tiny attacher and glue the ends in the back.
12 tags of 2015 - December | www.timholtz.com
step 25: give your paper bow character and shape by indenting the edges with your fingernail.  adhere the bow to the top of the wreath.
12 tags of 2015 - December | www.timholtz.com
step 26: cut the ends off a few small jingle brads (i know kinda defeats the purpose right?).
12 tags of 2015 - December | www.timholtz.com
step 27: adhere the bells to areas of the wreath with hot glue.
12 tags of 2015 - December | www.timholtz.com
step 28: for a snowy effect, add some white distress paint using the distress splatter brush.
12 tags of 2015 - December | www.timholtz.com
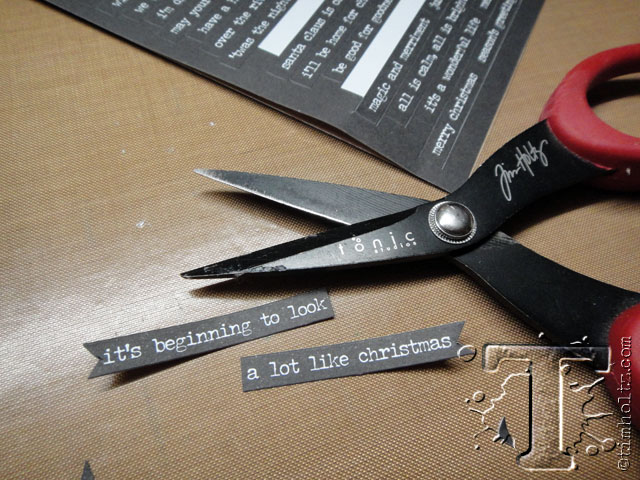
step 29: select a festive quote from the seasonal chitchat stickers, cut the quote in sections and snip one end of each into a flag.
12 tags of 2015 - December | www.timholtz.com
step 30: sand the edges of the stickers to reveal the white core.
12 tags of 2015 - December | www.timholtz.com
step 31: adhere the stickers to the burlap tag using glossy accents.
12 tags of 2015 - December | www.timholtz.com
step 32: proof that i figure things out as i go, i decided to add some stitching to my tag using my sewing machine (at least this way it was definitely more random which i like).
12 tags of 2015 - December | www.timholtz.com
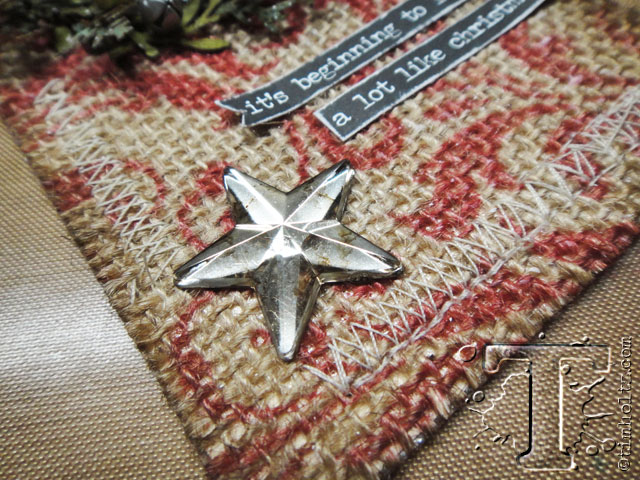
step 33: tint a mirrored star by dripping mushroom alcohol ink over it and blot off the excess with a paper towel.
12 tags of 2015 - December | www.timholtz.com
step 34: adhere the perfectly vintaged star to the burlap with hot glue.
12 tags of 2015 - December | www.timholtz.com
the details: hard to believe this tag started as plain burlap and some strips of colored cardstock.  i love the patterned background and the amazing dimension paper punches give this tag.
the 12 tags of 2015 have been packed with techniques all year long.
so if you’re looking for a convenient way to the have creative inspiration at your fingertips, i’ve created a digital download of all 12 months of tutorials with over 80 pages and 400+ photos!
check out my etsy shop to purchase the download (click here).


Thursday, September 10, 2015

Tips and Techniques: Reblog of Project Life Tag Album with September Skies Core and Value Kit from Heidi Swapp


Reblog from Heidi Swapp - Project Life Tag Album
- - - - - - - - - - - - - - - - - -
you are in for a fabulous treat today!!! My media team member Jamie Pate is sharing a beautiful mini album she created with my Becky Higgins Project Life September Skies Core and Value Kits now available at Hobby Lobby stores! there is so much eye candy in this post that you will want to bookmark this page to come back again and again!!!
Some of my favorite albums are the little ones. When the Project Life September Skies Core Kit arrived, those journaling cards said loud and clear that they were perfect for a tag album. Using those cards as the base, a birthday tag album was created to celebrate a recent birthday in the Pate household. Today’s post will share how that album came together, including a photo template made for mini photos, and other Heidi Swapp goodies to craft a memorable memory keepsake.
 Project Life Tag Album | Heidi Swapp and Project Life team up with September Skies journal cards to create a tag birthday album. @jamiepate for @heidiswapp
To start, photos were the focus. The album needed a real simple approach by way of the images, and so a photo template was needed first. A template was create that allowed mini photos sized 2 1/8 x 3 1/4-inches. But that was not enough. A ‘polaroid’ type frame that is so on trend currently would be what set these images apart. Thus a mini photo template was born, and can be downloaded HERE just for you! Perfect!
 Project Life Tag Album | Heidi Swapp and Project Life team up with September Skies journal cards to create a tag birthday album. @jamiepate for @heidiswapp
So now that the photo approach is settled, embellishments were to be decided on. The base of this project is the Project Life September Skies Core Kit. A selection of the 3×4-inch cards were gathered and stayed mainly pink, some teal, and a touch of grey. Overlays from the Value Kit of course was a good choice. And then various stickers sets that are part of the collection found at Hobby Lobby were going to add all the needed details.
Let’s get started.
 Project Life Tag Album | Heidi Swapp and Project Life team up with September Skies journal cards to create a tag birthday album. @jamiepate for @heidiswapp
A 6×4 glitter card was chosen to be the back ‘cover’ for the album. Clear acrylic paper was to be the front cover and was embellished with a polka dot stencil and Pink Texture Paste. It allowed for just a touch of see through.
 Project Life Tag Album | Heidi Swapp and Project Life team up with September Skies journal cards to create a tag birthday album. @jamiepate for @heidiswapp
The ‘enjoy’ glitter embellishment is trimmed out from a card in the Value Kit. And then other stickers and word phrases finished out the cover.
 Project Life Tag Album | Heidi Swapp and Project Life team up with September Skies journal cards to create a tag birthday album. @jamiepate for @heidiswapp
The inside tags each include a photo, of course. Each photo is mini attached to it’s individual 3×4 card. Then clear ephemera, punched paper pieces, word strips, chipboard images, and whatever else suited my fancy was layered on and under the photo.
 Project Life Tag Album | Heidi Swapp and Project Life team up with September Skies journal cards to create a tag birthday album. @jamiepate for @heidiswapp
Don’t forget there are great die cut pieces to be found in the Value Kit as seen here with the ‘pretty’ die cut. Just dab a small amount of hot glue on the back and adhere to the tag.
 Project Life Tag Album | Heidi Swapp and Project Life team up with September Skies journal cards to create a tag birthday album. @jamiepate for @heidiswapp
The overlays from the Core Kit found their way in here as well. This one is embellished with a glitter phrase to give it focus and some depth.
 Project Life Tag Album | Heidi Swapp and Project Life team up with September Skies journal cards to create a tag birthday album. @jamiepate for @heidiswapp
One way to get more mileage from embellishments is to cut up phrase stickers, like the Word Jumbles Vintage Stickers. These are some of my all time favorite embellishments Heidi has offered. Cut them up to give more interest to the layout.
 Project Life Tag Album | Heidi Swapp and Project Life team up with September Skies journal cards to create a tag birthday album. @jamiepate for @heidiswapp
Journaling is very important to this tag album and these memories. Remember the direction above about stapling the photo to the journal card?
 Project Life Tag Album | Heidi Swapp and Project Life team up with September Skies journal cards to create a tag birthday album. @jamiepate for @heidiswapp
That creates a self made flap on each card. A perfect place to journal thoughts and sentiments is hidden under each photo. This is at the heart of what makes these creations so meaningful. My daughter, celebrating 16 years here, will always have my words right here about her right now. These memories and moments are so quickly forgotten. We have nothing if we don’t have our memories. Each of these tags will hold my thoughts to her. Because it’s not just about the pretty stuff. It is about the photos. But it’s REALLY about the heart that you share with the one that you love.
There is a lot more eye candy to be found on my blog. Images of each page of this tag album can be found there, along with the download to the mini photo template. Hoping this inspires you to take your Project Life journal cards a tad farther and craft a beautiful album for any occasion.
I LOVE this Jamie! There are so many layers and textures that it just makes me want to flip through it in real life! Alright! head over to Jamie’s blog and check out more pages and inspiration!

Share This Post

Related Posts with Thumbnails